Tuesday, 27 March 2012

Comparing Dips....

Despite the title of this post this is not going to be a close up of the MHWC members. No, this post is to compare the effects of the various painting dips available to us wargamers. I apologise for any disappointment.

The first part of this comparison will look at the three shades of dip available from Army Painter, the soft, strong and dark. These three all work in the same way of course, it really is just a case of the tone. These are oil based and quite thick, something that leads many to no small concern. Pushing a painted figure into this gloopy dip does take some bravery to begin with but with proper care and attention the results are worth it. However, much will depend upon which shade of dip you try as the results are quite different.

For ease of comparison I painted four of the same figure in exactly the same way using the same colours. The painting is very basic, just base colours blocked in. The picture below shows an undipped figure on the left followed to the right by the soft tone dip, strong tone and then dark tone.


Army Painter themselves suggest that strong tone should be the default dip of choice, and I can see why. It is the one I use for most things but much will depend upon personal choice and the type of figure you are painting; various colours will work better with different shades. In this picture it is quite clear that any shade will alter the base colours. The soft tone has done this with the minimum of shading. The strong tone (figure three) is very different. The colours have changed far more and there is a lot of shading, I think faces do very well with dip and look more natural. Figures with painted eyes just look odd and creepy. The dark tone dip on the far right is very different. The grey base colour has masked some of the shading but kept a degree of depth, it looks a little less 'dirty' perhaps than the strong tone figure. Army Painter suggest that the soft tone is better used on predominantly light coloured figures, Napoleonic Austrians or 18th C. French etc. I can see the logic of that for the uniform colour but I prefer the definition that the other colours provide. So I tried the dark tone on white to see what happened.

The next picture compares the strong and dark tone. I should point out that the red used is different on both figures. The Marlburian figure on the left used the Army Painter pure red spray, the other figure a basic bright red from my paint box. Sorry, doesn't help I know, but it is the white bit I am looking at.


Now I do not think that the dark tone dip on the white of this Black Scorpion Marine looks too bad at all. In fact, I would be tempted to use that rather than the strong tone I normally favour in these cases. Imagine though, the initial concern of plunging your nicely painted white figure into what looks like black paint; a bit of a worry until you see the results. I should stress here that I do dip my figures and then spend some time...and a lot of energy...shaking the dip off in an even and controlled manner; not the 'shake three times and you're done' method suggested by Army Painter. 

I am not at all sure that the more brown coloured strong tone would have worked half as well on the marine figure. It does work very well on the more red based Marlburian though whereas the dark tone may have been to bold. This example shows well how the choice of dip can be dependant upon the figure colour and possibly be counter-intuitive too.

The next picture compares the Army Painter strong tone with the Vallejo acrylic dip, the sepia shade in this case. 


It would appear that there is not much difference between the two, at least to me but I am somewhat colour-blind of course. I am told that the acrylic dip is slightly darker, and provides a better degree of shading too. To my somewhat curious sight the acrylic dip has a greenish tint to it, but I am again told that this is not really so. The Vallejo dip does cover well and also provides a good mix of shade and tone; it is also far cheaper, smells better and being acrylic cleans up better too. I also find that brushing on varnish does not lift this dip and can be applied very quickly. This means that you can get a crack on and not wait for days whilst things cure off and dry sufficiently. One important issue to remember however, is that the Army Painter dip works best when varnished with the Anti-Shine varnish spray. The dipped figures look awful as the oily dip dries but transform marvellously once sprayed. The dip also seems to provide some protection too, a bit like a coat of gloss varnish. You do not get that with the acrylic dip.

This next picture shows a selection of figures painted with the acrylic dip. Again, basic paint job of block colour only.


I think these have come out quite well with relatively little work. The acrylic dip has been painted on
rather than dipped. It even works well with monsters!


So, has this post been of any use to you, dear reader? Let me know, I would love to hear your views.
 

Monday, 19 March 2012

Blogging from my mobile phone

It seems that I can now add posts to my blog from my mobile phone...how cool is that?
If I happen to be at a show, shop, club...or even the loo, I can post items of wargame interest there and then.
Ah, the wonders of our modern age! I wonder how often I will actually remember I ca do it?

Sunday, 18 March 2012

A blog worth watching


Millwall Mark came across this talented guy on ebay and told me to have a look at what he does. We were both very impressed indeed and followed the thread to take us to his own blog site.

Paul designs and molds wargame buildings in a range of scales and sells them for sensible prices, he even does a whole street of buildings with roads! His river side and bridge model is brilliant, and the guy will even work to a commision.

I really think this is a blog worth watching http://modbuildings.blogspot.co.uk, along with his ebay items; robertco100

I have invited him to attend Broadside as a trader, something he seems eager to do, so you will all be able to see his models for yourselves and pick up something that will grace your wargames table without damaging your pocket!


Friday, 16 March 2012

How dip works for me

I have been blogging away about the various benefits of dips for some time now, I think I should show you some of my figures so you can see the results for yourself.

First let me say that I do not have a good camera so some of the dip effects may be somewhat masked by poor photography.....and a dodgy photographer. But I am sure enough can be seen to give you all a good idea of the dip effect. Any questions, you know where to come.

The first picture is of some Dystopian Wars Prussian destroyers. These were painted with simple block colours with no undercoat or primer. They were then left for a day before being given a liberal wash with Vallejo acrylic brown dip, the bigger areas of pooling were lifted with the tip of the brush.


My first thought here is that the varnish, which I painted on, lifted some of the dip. I think they look lighter in colour and cleaner then they did. Of course, you wont be able to see that with these models so here is a picture of the larger Dystopian Wars Prussian cruiser; first with just the dip.


This picture does show how the dip can find and illustrate minor details, even brush strokes in the centre white stripe. Now, you decide, does the next picture look different? This one has been left for a day or more and the had varnish painted on. Has it made a big difference?


It seems there is another effect happening here, one where the varnish brings things into a clearer focus. This is what the Army Painter Anti-shine spray does with the oil based dip; I don't think fully appreciated how much even ordinary paint on varnish does the same thing. So, has the varnish washed some of the dip away or just brightened the model up....perhaps a bit of both?

These brilliant models from Spartan games are highly detailed with some very clear textured surfaces, the dip has plenty of detailing to play with.

Figures, either metal or plastic, tend not to have the textures but can still have plenty of detail for the dip to pick out. I find that the oil based dips tend to give a greater degree of overall shading, turning lighter colours darker but also more evenly than the acrylic. The red coats of the figures in the next picture started out as quite a garish lighter red, the Army Painter 'Pure Red' primer spray. Given my experiences I am confident that the acrylic dip used above would not give the same colourisation effect but would still provide good shading.


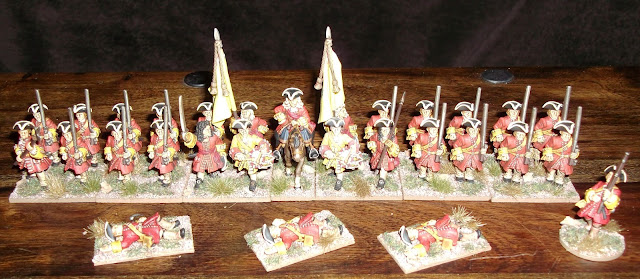
These British WSS figures by Front Rank have been dipped into the tin of Army Painter strong tone dip. I find that less is more and I shake off as much of the dip as possible to achieve and much more even coating than Army Painter suggest. I still get the shading and the details are still picked out well; at least I think so. I also found that you do need to be very neat and tidy when painting the figures, this allows the dip to better define the various areas. I think the dip does faces well too, not good at faces, me. All I do is paint in block Elf Flesh from GW and let the dip do the rest, much better effect than I could do on my own. I hate figures with the eyes painted in, the scale is usually wrong and the figures look, well, creepy.

I am not saying that these figures are perfect, far from it, but I am very pleased with the results. The anti shine spray is a vital process, just use it sparingly and do not hold the can too close to the figures, this will stop a lot of the 'frosting' that spray varnishes can cause. Also, leave the oil based dip to dry for several days. If the sip is still uncured, even though touch dry, the spray will blister the dip and your figures are ruined. You can paint varnish on as soon as the dip is touch dry, you just wont get as good a result.

The next picture is of my British WSS artillery, also by Front Rank; love those figures. These were painted in the same way as the infantry, guns too, but I used a flash this time, stupid camera.


actually, here is a shot of the infantry with the flash too, just for comparison.


So there you go, me and dip. In another blog I will compare the effects of the three different Army Painter dips, soft tone, strong tone and dark tone.

Wednesday, 14 March 2012

A difference in dips


When is a dip not a dip?

I have had great success with the Army Painter dip and had High hopes for the Vallejo acrylic dips too, as my previous posts mention. However, I have begun to notice how differently they work and the effects they produce. Where the oil based dip leaves a more evenly spread wash and staining the acrylic one seems to dry into patches. You still get the general effect but so far I have not been as happy with the results on larger, flatter areas. It also has a quite severe dulling effect on metallic colours, bronze and gold shades particularly. I have been working on a set of Prussian ships for Dystopian wars and have been fairly pleased with the results but......well, I can't help wondering how they would have come out with the oil dip and anti-shine spray.

I left the painted ships, the nine destroyers in the fleet pack, for a day so the paint could cure/set properly before liberally coating them with the acrylic brown dip; lifting off the excess as I went etc. I then left them for another day for the dip to fully dry in all areas before painting on a matt varnish. Here I noted that the varnish was washing away some of the dip, giving a lighter look to the finished models than I had envisioned. I am often accused of making things too dark, a symptom of my colour issues, and I cannot say that the end product did not look too bad, but....

The acrylic dip is appearing to be less predictable than the oil but it still provides decent effects. It also settles in the tub very quickly leaving dried residue around the edge if you are not careful. I also have a tub of the acrylic black dip and I have found that to be very dark indeed. Some caution should be used with these dips, especially when you first use them. definitely try them on a spare painted figure so you get to see the effects first. A basic and obvious warning but one that is well worth mentioning again.

There is still and important place at my painting area for these Vallejo acrylic dips, I just need to think about how I use them.

Tuesday, 13 March 2012

Cavalier and 28mm Plastics

I spent an enjoyable few hours wandering around the Cavalier wargame show a few weeks ago but have only just got around to putting anything about it on my blog! Sorry about that.

I have to say that I thought the show far less busy than previous years but, after speaking to a few of the traders I have come to know through organising Broadside, it seems many of them had one of their best days in terms of cash taken. I have come across the phenomenon before, smaller shows do not necessarily mean smaller takes for traders. I think it may have something to do with time and space....not the weird sci-fi stuff...which is great by the way....but the time and space potential customers have to look at each stands offer, speak to the trader and be allowed the freedom to buy. I know that I have often not even looked at some stands at shows for the melee of bodies around them. Might I have bought something there? Quite possibly.

I did get the chance to chat with some old friends, and some new ones to.....Hi Ray!! Top guy, Ray, looking forward to seeing him and his club at Broadside. I once worked for a guy called Ray Gunn, straight up, Ray Gunn. He is the premises manager at Crown Woods School if you do not believe me. I was an assistant there for a few years before I was made premises manager of my own school. He too is a great guy btw. His dad was Tommy.....I know, I know, but it is all true. Truth eh? Who needs fiction?

Where was I? oh yeah, Cavalier. Maria and I were there to help spread the word about Broadside. Maria was handing out flyers left right and centre, whilst I spoke to the traders and touted for new business; picked up another three! Good ol' Clint spoke to the clubs and we gained a few there too. We did very well here and raised our profile greatly. Plenty of people remembered the first show and word seems to have spread. we could do well this year methinks. I also took the opportunity to pass on a special gift I had for a friend and fellow MHWC member....the dodgy millwall fan that I mention in the Blog intro. I had an Arsenal FC painting kit I picked up at a sports shop sale....I even wrapped it in special pretty paper, I am that nice. Needless to say he wasn't at all that pleased, oddly. In fact he was quite miffed in a sort of 'I'm going to tear bits of you off and beat you to death with them' kind of way; the old soppy. He had to carry it around for the rest of the day too. Bless. And, do you know, I am not at all sure he is a Millwall fan. I came accross a photo of him in a Charlton shirt...that hadn't been messed around with or anything! Who Knew!? I would post it here but would not like to be the cause of any embaressment....unless you would all like to see a copy of it?????????

As for purchases, I have often looked at the 28mm plastic Marlburian figures by Wargames Factory, but only looked. I am a huge fan of Front Rank and all my Brits and allies are coming from there. But, as I am working on this huge Black Powder project on my own and therefore looking to cut costs, I thought the well priced plastics could be useful. I managed to pick up a box of each of the infantry and cavalry and was mightily pleased that I did!


Infantry first. The first thing that I noticed was the way the individual sprues have been made with pegs and sockets that allow them to be neatly stacked in the box. A simple thing perhaps, but it did make it so much easier to handle them and put them back in the box without breaking bayonets and things. The figures are also much better than the box artwork shows...a lot better in fact. You get 36 figures for less than £16 if you shop around and I only need 24 plus some casualties. You also get a lot of choice as to how you ,ake the figures, plenty of individual heads that will allow you to creat almost any unit in any army of the time; very neat indeed. Most of the figures are in a one piece marching pose (bar the head of course) so little building too. The pose is a little stiff but does suit the period. Well worth the money I think...still prefer my Fronk Rank figures but these are some £10.00 cheaper per unit.

The cavalry are bloody brilliant. At the same price of £16 you get twelve figures.


The great thing here is the amount of choice you have when building the riders. Each sprue has four different bodies and four different head choices, you can build all sorts of mounted units and the horses look like horses...not like some of the odd looking things you see in metal even today. Compared with the metal equivilents this box is half the price of the Front Rank units, themselves excellent value compared to most. The figures again come with the post and socket system, a real neat trick, and twelve plastic stands for the horses. For me this is the only let down, and it is a mean complaint really. As you can see in the picture above, the horses have  feet......not feet attached to something, like a peg or slide to fit into a slot. This means that the horses need to be glued to thier bases with fairly little to support them, especially those horses with two feet off the ground. I will need to look at this when the time comes and see how they work. Given the attention to detail Wargames Factory have shown so far I doubt they would have slipped here, surely?

Oh No! Stupid computer!!! I didnt want that picture on my blog!! whatever shall I do now??

Mark, if you are reading this, stop now!!


No, really.....stop now


you don't trust me do you?????